Showing posts with label technique Tuesday. Show all posts

Tuesday, May 1, 2012

Technique Tuesday: Life Line

Life lines, are well, a life saver.  If you are starting to dip your feet into the knitted lace ocean than I highly suggest knowing how to use a life line.  A life line allows you to rip back your work with out losing stitches.  They can provide a bit of piece of mind while you are knitting lace for the first time, or are knitting up a complicated lace pattern (like this one).
You will need a tapestry needle and some waste yarn.  I highly recomend using a yarn that will not catch or stick to the yarn  in your project.  Some mercerized cotton is usually a safe bet. 

Thread your needle and than slip the needle through the stitch of your work.  I like to do it on the live stitches because they are all lined up and easy to see.  I also like to install my life line before I work my purl row.  If you are using any stitch markers do not thread the life line through them. 

Here you can see my life line hanging out either end of my knitting.  This is what an life line looks like as you work.  Keep knitting your project.  Now here is where the life line becomes important.  Lets say you notice your stitch count was off, or that you have been doing the lace chart wrong.  Have no fear.  

Pull your work off your needle and start frogging you work.  I know it sounds scary, but I promise that the life line will keep you afloat.  

In this photo I have frogged back to my life line.  In all actuality I can't frog any farther unless I remove the life line.  The life line is acting like a large stitch holder holding all of my life stitches in place.  

Now you just pick the stitches back up with your needle and continue on your way.   I leave my life lines in till I have finished my project.  

Here you can see my sample bound off with the life line still in the work.  Easy peasy, just pull one end of the life line and it will slip right out. 

Ta Da!  Finished.  

Tuesday, April 3, 2012

Technique Tuesday: Joining in the Round

Have you ever joined your stitches in the round and found to have a jog or a hole where your first stitch and your last stitch meet?  This is a common problem when knitting anything in the round, especially thumbs on mittens or sleeves on a top down sweater.  There is a quick and simple technique that can solve this unsightly problem.  All it requires you to do is cross your stitches at the join.  

That's it. 

It's super simple to do all you do is switch your stitches.  Your last stitch becomes your first stitch and your first stitch becomes your last stitch.  Below you can see just how easy this great little technique is.  

Here are some stitches that have been cast on for a hat.

 Slip the first and the last stitch off the needles.

Slip the the first stitch onto the right hand needle.

Slip the last stitch onto the left hand needle. 
Place your marker and you're ready to start knitting in the round. 

Here's what the join looks like after a round of knits. 

See the easiest little trick for closing up that gap.  This trick is best for any join you have in the round.  I like it for after thought heels and thumbs or fingers on mittens and gloves.  

Tuesday, March 6, 2012

Technique Tuesday: Saving A Dropped Stitch (Stockinette Stitch)


Every knitter has dropped a stitch before.  It can be frustrating  especially if you don't catch it right away.  There is a way to remedy the drop stitch and the ladder of jogs it leaves behind.


First off, identifying the dropped stitch and the corresponding jogs.  The jogs look like the rungs of a ladder, these are what use to be stitches.  To fix this mistake you need to pull the jogs through the dropped stitch to create stitches that will lead back to the top of your work.  You are technically knitting vertically.


You will need a handy dandy crochet hook.  I keep one in my knitting bag for just such occasions.


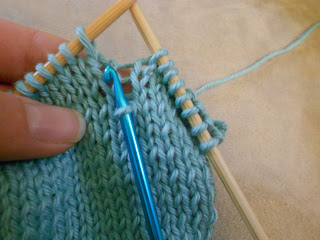
1. Insert the crochet hook in to the drop stitch.


2. Slide the crochet hook under your first jog.


3. Pull the crochet hook down catching the jog and pulling it through the dropped stitch.


repeat steps 2 and 3 until all the jogs have been restored to stitches and your drop stitch is at the top of the work.  Slip the stitch back on the needle and continue knitting.

Tuesday, February 28, 2012

Technique Tuesday: Spit Felting

I hate having to weave in ends in my knitting.  When I cast off I want to be done with my project, except for a few minor finishing bits like blocking or buttons.  Because of my hatred of ends I try to avoid them at all costs and one of those ways is by spit felting.

Spit felting is a way to join two strands of yarn together with out a knot or with out ends hanging out.  It only works with animal fibers, I repeat it only works with animal fibers.  This is because animal fibers have scales on the individual fibers that allow them to lock together.

Things that will NOT spit felt are: Super wash anything, cotton, linen, silk, bamboo, rayon, pretty much anything that is a plant fiber.  All of these fibers don't have scales.  The reason it won't work in super wash is because that fiber has been treated and changed so that it's scales have been removed.

However Spit felting will work on a blended fiber as long as there is about 35%-50% animal fiber in the blend.  For example I've never had a problem spit felting a 50/50 wool silk blend.  


Now, how does one spit felt.  Here is my example.  I want to join the end of one ball of wool to the beginning of another ball of yarn.  (I'm using two different colors of yarn so you can see the process more clearly.)


You are going to untwist the plies.  If it is a singly ply you will just fray the end of the yarn and untwist it.  Try  to give yourself about an inch and a half to two inches of untwisted plies.  


Now get those untwisted plies nice and wet with spit.  Yup these puppies are soaked in my spit.  You can either stick the yarn right in your mouth our find a more lady like way to do it, but lets be honest your going to get a little fiber in your mouth either way.  


Intermingle the two ends making sure they get nice and tangled into each other.  Now for the magic.  Either rub the intermingled fibers between your hands or on your leg.  Make sure to rub back and forth pretty vigorously.


Once your fibers are felted together they will look something like this, one glorious continuous length of yarn.  You can continue to knit, with out worrying about knots or ends to weave in later, 

Tuesday, January 10, 2012

Technique Tuesday: Applied I-Cord Bind Off


This is a great way to add a little interest to a bind off edge and is great for really any project from the bind off edge of a lace project to the cuff of a sleeve.  Another thing that is useful is that this type of bind off creates a tube with you can use as the casing for elastic or a draw string.


When you come to your bind off you are first going to cast on 3 stitches using the backward loop method.
Next you will K2, SSK.  This way you are always decreasing a stitch in your bind off row.


Slip the last three stitches from the right hand needle back to the left hand needle
Repeat this method till you have one stitch left on your original bind off row.


Bind off the I-cord as follows,  Knit 2 pass first stitch over the second, SSK, pass the second stitch over the third stitch of the bind off pass yarn through loop and pull tight.  Weave in ends.

Monday, December 5, 2011

Monday's Technique Tuesday: Swatches, Row Count

I can not say enough how important it is to swatch before you start.  With the excitement of a new project who wouldn't want to jump right in, but hold your horses, take a deep breath and swatch with your yarn and needles first.  Last time we looked at stitch count, and today we are going to look at row count.  Now some may say row count is not as important as stitch count, (sometimes I do feel that way), but when it comes to decreasing or increasing you should really have an accurate row count

We are going to look st the same swatch that we looked at for stitch count.


The length from top to bottom of the stockinette section is 4 inches:


Start at the bottom and count the stitches that forma a vertical row:


In this swatch there are 24 stitch in 4 inches:


Divide the number you got by the number of inches and there you have it your row count. for this swatch the row count is 6 rows per inch.  A helpful tip is to use a straight edge to line up you vertical row of stitched it allows you to better read the row you want to count.

Tuesday, November 15, 2011

Technique Tuesday: Swatching I

Like I said yesterday I am a big advocate for swatching.  It is really important whether you are designing your own knit item or using a designer's pattern.  Everyone's gauge is different and swatching allows you to see if you need to make any adjustments to the needle size or stitch count. Swatching also lets you get to know the stitch pattern you are going to use and lets you experience your yarn and get to know it before you take on your project.

There are plenty of reasons to swatch and today I am only going to talk about one of those reasons, stitches per inch.  When you knit a swatch you want to make sure that the swatch is about 4 to 5 inches in width and height.  If you are using a pattern there will be a suggested gauge of usually 2 to 4 inches you want to knit about an inch to two inches more than this suggested gauge so that you can get an accurate measurement.  If you are looking to find a certain yarn's stitch per inch look at the ball band, there is usually a suggestion of an amount of stitches to 4 inches or to 10 centimeters,  this is a good place to start.  If a suggested gauge is 20 stitch to 4 inches when you cast on for your swatch you will want to cast on about 30 stitches.

  Here is a basic swatch in a worsted weight yarn on size US 8 needles knit in stockinette.  I cast on about 28 stitches for this swatch.  This gives me plenty of room to measure.

I like to measure from the 2 inch mark on my tape to the 4 inch mark.  Line up your tape so that you have a row of stitches between the two inches on the measuring tape.  Then count the stitches all the way across.  If a stitch is cut in half at the end of the tape it will be added into the stitch count as a 1/2 of a stitch.

Here's a better picture of the stitches I counted.  I got 10 1/2 stitches to 2 inches.  This means that my stitch per inch count is 5.25 stitches for one inch.  The quarter, half and three quarters of a stitch are very important and should be taken into account when trying to figure out your stitches per inch.  This is also why you measure across multiple inches, it makes it easier to find your true gauge. 

Now if you were using a pattern and you had too many stitches per inch you would go up a needle size till you got the right count.  Inversely if you had too few stitches per inch you would go down a needle size till you got the count you were looking for.  It makes a big difference if you are 5 stitches to the inch or 6 stitches.