Saturday, December 17, 2011

Day 5: Easy Knit Garland with Button Ornaments


You can see our Lobster hanging out in the background
 Our Apartment is small, I mean really small, so we never have a Christmas tree.  Simon is always a bit sad that we don't have a Christmas tree so this year I surprised him with a small rosemary cone from Whole Foods.  It fits on our entertainment center nicely and gives the living room a festive feel and it smells wonderful.  I made a few quick ornaments and a i-cord garland for our little tree so he could decorate it.  Here's How.

I-Cord Garland

Materials
Novelty yarn (Mine was a with nylon with sequence attaches)
Leftover Bit of some special yarn (This was some of my hand-spun left over from another project)
2 DPNs the appropriate size for yarn (I used US 2)


Cast on 4 stitches and work in I-cord till Garland is desired length, (mine was about 4 ft).  Bind off and weave in ends
Tie the I-cord and the left over bit of yarn together.  Wrap the leftover bit around the I-cord, knotting them together at the end.

Button Ornaments


Materials
Different Size and color Buttons
Ribbon
Hot Glue Gun


Stack buttons and glue them together in interesting combinations.


Cut about 2 to 3 inches of ribbon.  Form a Loop and glue on to the back of the button stack.  
 Now you can go and decorate your tiny tree!

Friday, December 16, 2011

Day 4: Christmas Link Love

For the last few weeks I have been scouring my favorite blogs for great holiday tutorials that would make great last minuet gifts or a lovely handmade stocking stuffer.  I am really excited about all of these links and absolutely love all of these ideas. 

1. Make a special holiday cocktail with Delightfully Tacky's Peppermint Vodka Tutorial

Delightfully Tacky, Peppermint Vodka
2. Over on Good Knits, learn how to make cute winter hat ornaments with Kate from Otillie's Closet.

Good Knits, Winter Hat Ornaments

3. Alli on One Pearl Button has a great tutorial on sewing a quick little gift bag.

OPB, Sweet and Simple Gift Pouch
4. Need a cozy gift for a friend?  Try making a Cowl Neck Scarf with Zoe over on So Zoe...What Do You Know?

So Zoe..., Cowl Neck Scarf
5. Burda Style has a tutorial for Ruffle Cuffs.  They look easy enough to make and you can style them any way you want.

Burda Style, Ruffle Cuffs
6. I am planing on making these yummy Cardamom Sugar Cookies from over on the Etsy Blog this weekend.

Etsy Blog, Cardamom Sugar Cookies

Thursday, December 15, 2011

Day 3: Easy As Pie Tam Knitting Pattern


 This knitting pattern is for a simple and quick tam or beret.  What I love about this pattern is that it works up quickly and you can make it in almost any fiber just make sure that the fiber you choose has enough memory or spring for the brim of the hat.  I like a wool silk blend, or a blended Angora for extra warmth and luxury. 

Materials:
120 Yard of a Worsted Weight Yarn
Us 8 16 inch Circular Needles
US 8 DPNs
Stitch Marker

Gauge:
About 4 sts to the inch in stockinette on US 8 needles, Aggressively Blocked

CO 80 sts
Place Marker and join work being careful not to twist cast on edge.
Work in 2x2 rib for about 1-11/2 inches.

Increases:
R1: Knit 10 M1, repeat this to marker
R2: Knit All
R3: Knit 11, M1, repeat this to marker
R4: Knit All
R5: K12, M1, repeat this to marker

Knit even till the hat measures about 4 inches from the cast on edge.  (If you would like your tam to have more room in or be a bit more floppy knit even till you have 5 to 6 inches from the cast on edge.)

Decreases
R1: K11, K2tog, Repeat this to marker
R2: Knit All
R3: K10, K2tog, Repeat this to marker
R4: Knit All
R5: K9, K2tog, Repeat this to marker
R6: Knit All
R7: K8, K2tog, Repeat this to marker
R8: Knit All
R9: K7, K2tog, Repeat this to marker
R10 Knit All
R11: K6, K2tog, Repeat this to marker
R12 Knit All
R13: K5, k2tog, Repeat this to marker
R14: Knit All (Switch To DPNs)
R15: K4, K2tog, Repeat this to marker
R16: Knit all
R17: K3, K2tog, Repeat this to marker
R18: Knit All
R19: K2, K2tog, Repeat this to marker
R20: K1, K2tog, Repeat this to marker
R21: K2tog, Repeat this to marker
R22: K2tog, Repeat this to marker

Work I-cord for 2 rows.
Bind Off
Weave in ends

To get the desired Tam shape you will need to aggressively wet block your tam on a plate.

Wednesday, December 14, 2011

Day 2: Makeing a Mobius Cowl


Everyone loves a handmade gift, and who wouldn't like an excuse to buy a half a yard of that wool cashmere blend in cream from your favorite fabric store.  Here is a quick, and simple gift to make to bring a bit of warmth and luxury to someone special (and yourself because 1/2 a yard makes two). 


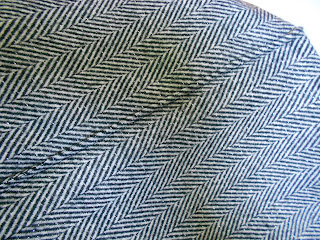
I found these wool blends at my favorite fabric store.  The Picture doesn't do it justice, but the black and white has silver threads running through it, giving it just a little bit of sparkle.


Materials
1/2 a yard of a wool or wool blend woven, about 60 inches wide
Matching thread
Pins
Sewing Machine

1. Cut the fabric in half so that you have two 30 inch pieces of fabric.  

Folded in half lengthwise
 2. Fold in half lengthwise with right sides facing each other.  Pin and sew leaving about 1/2 inch seam allowance.  If your fabric is prone to fraying you may want to zig zag along the seam allowance.


 3. Turn right side out.  You know have a tube that is about 30" long.  Fold one end of the tube in on it's self about 1/2" to 3/4" and pin in place.  

Folding the edge down
 4.  Now take the other end and twist it 180 degrees, and insert the raw end into the end with the folded edges.  Your edge with the seam shouldn't match up it they do you either haven't twisted it or you have twisted too much. Pin these two edges together and sew a seam about 1/4 inch from the fold.  

You can barely see it, but there's a seam in there somewhere. 

5. Clip your ends and wrap or wear.  (Like I said you can make two with 1/2 a yard of 60 inch fabric.)


Tuesday, December 13, 2011

Day 1: Holiday Tradition: Fudge

I have to admit I have a pretty big sweet tooth sometimes and the holidays just seem to make it ten fold.  My great aunt use to make fudge and when she stopped my mom started, now my mom is on a health kick and I see it as part of my holiday duty to keep the tradition alive.  I've been making Christmas Fudge for about three years now and use the recipe my mom used which is to say I use the Fluff Never Fail Fudge recipe.

You can fin the recipe on their website and on the side of the jars of Fluff.  This fudge is super easy to make I don't even use a candy thermometer that's how easy it is to make this fudge.

I am going to share my doubled recipe and a few tips for optimum fudge production.  First off I make 5lbs of fudge every Christmas.  This ensures that I have plenty to give away and a tiny bit left over for my nagging sweet tooth.  This means I double the recipe found on the Fluff website.  My ingredients list looks like this.

5 cups sugar
1 stick butter
10 oz of evaporated milk
1 large jar of Fluff (or 2 of the 7 oz jars)
Vanilla
2 12oz bags of semi sweet chocolate chips (I like Tollhouse, but any chip will do)

The directions are still the same, you are just working with twice the amount of ingredients.  Before I start cooking my fudge I first line all of the pans that I will be pouring the fudge into with foil.  This makes it easier to remove the fudge for cutting and makes clean up way easier.  By doing this you will not have to worry about your fudge sticking to your pans.


I use a pretty big non stick pot to make my fudge in, the fudge will start to bubble and expand when you heat it so you want to make sure that you use a large pot so it doesn't bubble over.  The pot I use is the same pot I cook pasta in.  I start by heating up the butter till it's melted and then add in all the other ingrediants ending with the Fluff.


This is where is gets tricky.  You need the sugar and everything to combine and liquify while not scorching on the bottom of the pot.  You can't have the heat too low or the sugar will never get to temperature, but too high and you will burn the sugar.  A way to avoid this is to constantly stir your sugar mixture.  I use a sturdy silicone spatula and a constantly stir around the edge of the pot.


 This is where some of the sugar may stick and you want to avoid that.  When your sugar doesn't get to temperature and or sticks to the side of your pot you are left with grainy textured fudge.


  Before I start I also set out a measuring cup of cool water, this is important to check the sugar mixture.  This is why.  About 3-5 min. in to the boiling of the sugar mixture I like to check its progress.  Lift a small amount of the sugar mixture out of the pot with a spoon place the spoon directly in the cool water.  The sugar should cool and you should be able to touch it.  Roll it between your fingers if it is smooth and gummy it is finished, if it is lose and grainy you still need to keep heating it, if it is hard then it has gotten to hot.  I've notice that it takes about 5 to 8 minuets for the sugar to reach temperature, but this is all relative to the batch and the conditions in your kitchen so test as you go.


When the sugar is at temp you will turn off the heat and start pouring the chocolate chips into the sugar along with the vanilla.  I like to stir them in about a cup at a time, but you need to work fast because you want you fudge to stay hot so when you pour it it doesn't stick to your pot.  Once all your chocolate is melted and stirred in pour on to your foil lined pans to let it cool.  Now you can decided how thick or thin you want you fudge to be, but it all depends on the depth of your pan.  When I make 5lbs of fudge I pour it so that it is about 1/2 inch thick.  I use one 13"x8" pan and a 8"x8" pan to hold all of that fudge.


Let the fudge cool on a kitchen counter for a few hours.  I don't place my fudge in the fridge till after it is cooled and cut.  The one time I did that my fudge became crumbly and hard, my theory is that it cooled too quickly.

Cut into bite sized pieces and enjoy.  I save the edges for Simon and I.  The good center pieces get wrapped up and placed in pretty packages for gifts.  

There is my fudge making tips, good luck!

Monday, December 12, 2011

NYC Weekend


This weekend I spent Saturday in New York City for a good friends Bachlorette party.  We really like hanging together as a large group so all of ladies took the bride out to dinner and then we met up with the guys at a kareoke bar and had a great time singing kareoke in a private room.  Foe some reason there were tons of people dress as Santa that night. 

So Many Santas
Blurry, but a better shot of just how many Santas were singing kereoke.
It's time to Celebrate!
The happy Couple Sing a Duet. 
A quick pic with the lady of the hour. 
After a night of singing and drinks we needed some pancakes for Breakfast.

 It was great to go hang in NYC with some friends who I haven't seen in awhile, but I must say I was glad to return to Philly.  I love the city I live in.

Friday, December 9, 2011

For the Love of Philly: Morning Glory

Garden Keeper Fritata
Simon and I live in a great neighborhood called Bella Vista and it has some amazing restaurants.  One of our Favorites is called Morning Glory.  Morning Glory is a Finer Dinner and it is a tiny gem of a restaurant. It is located on the south side corner of Fitzwater and 10th Street, and although its size is small the food is anything but your regular dinner fare.

View from the door
The menu has eats like, the garden keeper fritata which is filled with potatoes, greens and ham, Monkey Bread French Toast with mangoes, bananas and caramel sauce, and Guinness Beef Stew.  Their specials are always changing with the season, and highly recommended.  This spot is a Philly Favorite when it comes to brunch.

Special: Mediterranean Scramble


Eggs over easy with sausage and a buttermilk biscuit.
 With limited space "be nice or leave" is a great motto as you are in close quarters with other dinners and can watch the line cooks prepare your meal.  There are plenty of other interesting things about Morning Glory.  They make their own ketchup (it is some of the best ketchup I have ever eaten).  They also make homemade buttermilk biscuits and there is always fresh fruit compote on every table.  When you order coffee it comes to you in a metal cup. 

View of the kitchen from our table
 You can always expect a wait to eat on the weekends at Morning Glory, and it is well worth the wait to get in.  If you are impatient and want to be seated right away go on one of the weekdays right before or after lunchtime.  Or if you can only make it on the weekend go early or late the wait is shorter than if you go between 10am and 1pm. 

Morning Glory
10th and Fitzwater Street
Philadelphia PA 19147

Hours:
Monday-Friday
7am-4pm
Saturday &Sunday
8am-3pm