Wednesday, November 30, 2011

What I am Sewing/Knitting


Now that my Steffi Jacket is finished I find myself wondering what's next.  Well I figured that one out, a few sewing projects that only take a couple of hours to complete.  I started this week with a trip to the fabric store and I got some great stuff. 

One of the first things I sewed was a simple gathered skirt out of this forest green silk cotton I had left over from another project.  I used Gertie's Gathered Skirt Tutorial Part I and Part II, and it came out great.  I will post pictures when I finally hem the thing (on today's to do list).

T-shirt Mini Dress
 Next I moved on to DixieDIY T-Shirt Mini Dress.  I bought some great slate colored cotton blend jersey at the fabric store for $1.98 a yard and I made this in about two hours from cutting to hemming.  It looks a bit blah on the hanger, but with leggings, a belt, my new black boots and my leather jacket it will be rock 'n roll chic.


I plan on making another one today with a coral colored cotton jersey that has been in my stash for months.  That's today's sewing goal (along with hemming the gathered skirt).

Tomorrow I plan on making myself this:

The Marie Skirt
 But with this Fabric:


I'm feeling a bit of a rock 'n roll vibe this week.  My weekend might be a me made one.  The last few project I've done have been classic and timeless and I guess I'm feeling like I need to have a few pieces that are a bit more edgy. 

Before I leave I also want to show you the cardigan I just finished knitting.  Fresh of the blocking board!


Not the best shot, but I plan on having the Hubs help me take some good photos next week.


Tuesday, November 29, 2011

Giveaway Winners!

First off thank you to everyone who participated in my Thanksgiving Giveaways.  Here are the results...drum roll please!

The Winner of the January Issue of Creative Knitting is...Libraryminion! Congrats, please email me with you contact info and the address that you would like to have the magazine sent to.

The winner of the Southerly Pattern Set is....Cheryl A-S.  Please contact me with the email address that you would like the PDFs of the patterns sent to. 

And finally our runner up for the Black Friday Cyber Monday Giveaway is...Lee!  Contact me with your email and I will send you the PDF for the Wintertide Gauntlets. 

Congratulations to all the winners and thanks again to everyone who participated!

Monday, November 28, 2011

Shameless Plug: Cyber Monday

Sun set on Thanksgiving Day
 I hope everyone had a great weekend.  Mine was spent in the Finger Lakes with my parents eating a lot of turkey and drinking amazing wine from Rooster Hill.  Rooster Hill is one of my favorite wineries in the Finger Lakes.  I am a bit bias though because my mom does work there.  They do have wonderful wine though especially the Lemberg '08 Reserve, and the 2010 Chardonnay.

I just want to put in a quick reminder that today is the last day to enter both of my Thanksgiving Giveaways.  You can enter to win a pattern set or you can enter to win a copy Creative Knitting Magazine's January 2012 issue.  I will be announcing the winners tomorrow here on the blog.  Good Luck.

If you are a member of Ravelry.com you can also take advantage of a pattern promotion I am having on Ravelry.  When you purchase two patterns you get the choice of the Peaks and Valleys Beanie or the Fall of the Lead Fingerless Mitts for free.  Just enter the promotion code giftknit at check out. This code is good till the end of November

Also today is the last day the the coupon codes in my Etsy Shop will be active.  For free shipping on all domestic shipping use SHIP4FREE.  To recieve 10% of your Purchase use BBFAN1.  

With November drawing to a close and the Holiday season in full swing I must put my nose to the grind stone and start knitting and baking and shopping.  Simon has already hung the Christmas lights on the surfboards with care.  He loves this time of year and this year I think I'm going to decorate a bit more than last year.

The twilight sky from Rooster Hill Winery


Friday, November 25, 2011

Black Friday Offer, Cyber Monday Giveaway

This weekend is a crazy retail frenzy.  For everyone who is knitting gifts, or buying handmade I wanted to have a special giveaway and offer.

First the offer, Starting today through Monday the 28th I will be offering free domestic shipping on all items that are shipped through the USPS in my Etsy Shop.  To take advantage of this great offer all you have to do is enter the coupon code SHIP4FREE at check out. 

Now on to the fun part I am giving away the Southerly Pattern Set to one lucky reader of Blue Betty.  This set includes the Southerly Tam Knitting Pattern and the Fall of the Leaf Fingerless Mitts Knitting Pattern. 


Also two runners up will receive a copy of the Wintertide Gauntlets Knitting Pattern.

To enter just leave a comment letting me know how your thanksgiving was or what your holiday plans are.  For a second chance to enter go to my Etsy Shop and pick out which item you would most like to receive as a gift and post it here in the comments. 

I will pick a winner and the runners up randomly Monday Night and will announce them on Tuesday here on Blue Betty.  This giveaway to open to everyone! 


Thursday, November 24, 2011

Thanksgiving Thank You


I would like to thank all the readers of Blue Betty.  I am very grateful for your readership.  Because you guys are awesome I am having a special offer for Blue Betty readers, 10% off all items in my Etsy Shop.  Just enter the coupon code BBFAN11 at check out to receive 10% off your purchase.  This offer will be good through Monday the 28th.

Happy Thanksgiving to all!

Wednesday, November 23, 2011

Sewing the Steffi Jacket: Final Touches

As promised, pictures of my progress with the Steffi. 

Basting the lining and jacket together in preparation of sewing the facing on.

Completed basting ready and waiting for the facing.

Facing sewn on and sleeves hemmed.  This is when I started to realize I was almost finished.  And I still needed to go buy buttons.

I under stitched the facing's seam allowance.  It gave the edge of the jacket a nice finished look to it, and it made the front of the jacket and the facing lay a lot nicer when i steam ironed it.  I am defiantly doing this more in the future.  (You can see that I hadn't taken out the basting stitch yet in this pic.)

In the end I did decide to finish the facings edge with bias binding, and it just so happened that I had some vintage bias binding in navy.  (Side note: I need new fabric scissors.)


The Bias binding took a big chunk of time to complete, but the final look was worth it.

Bias binding attached and hand sewn to the lining.

Here's a close up of the finished edge.

Yesterday I also practiced button holes on my sewing machine the top three were my last attempts and my best.  I'm still nervous about the button holes, but I am ready and know exactly what I'm doing. 

Yesterday I braved the wind and the rain to buy these little buggers.  BUTTONS! I finally went out and bought buttons for this jacket.  I ended up buying fabric and there was tons of new stuff in the shop that I wanted to get.

There is one more day to my self imposed deadline to finish this jacket and I think I'm going to make it.  All I have to do today is make six button holes and sew 6 buttons.  And then voila, a jacket.

Tuesday, November 22, 2011

Gray Day

I canceled my planed post today as I wasn't feeling it.  It's a gray, wet, chilly day here in Philadelphia and I am determined to finish my steffi jacket.  This afternoon I will be sewing the facing down, buying buttons, and practicing button holes on the muslin. 

I also will start packing for Thanksgiving and since I finished my plucky sweater and alpaca vest I need to figure out a new project.  I'm still rocking the sweater knitting right now and I'm itching to design.  Off I go to my sewing machine I will have tons of updates on the jacket tomorrow. 

Monday, November 21, 2011

Thanksgiving Week Giveaway!

Creative Knitting Magazine
The latest issue of Creative Knitting Magazine is out and I am lucky enough to have one of my designs in this issue.  I am also lucky enough to have an extra copy of the January issue to give away this week as a Thanksgiving Week Giveaway. 

To enter leave a comment here on this post letting me know what you holiday craft and gift knitting plans are.  I will pick a winner randomly on Tuesday the 29th of November.  You can enter a second time by going to Creative Knitting Magazine and looking at the Current Issue section and post a comment here about which is your favorite project.

This giveaway is open to residents of the U.S.  If you have any questions please feel free to contact me.  Check back later in this week for more offers, holiday giveaways, and a special thank you for fans of Blue Betty.  


Friday, November 18, 2011

Pattern Release: Wintertide

Here it is Wintertide! My newest pattern out just in time for the holiday season.  This simple gauntlet pattern is made spicier by a fun lace stitch pattern and a simple thumb gusset.  These cozy fingerless mitts are a great knitted gift.  The suggested yarn is a bulky wool and silk blend and the needle size is a US 10 making these a quick knit. 

This is a great knitted accesory for the chilly months to come!

Thursday, November 17, 2011

Stitch Guide: Mistake Rib

Mistake rib is what happens when you try to do a 2x2 rib with and odd number of stitches.  The look of this stitch is similar to a 1x1 rib, but the knit columns are raised up.  This is because on either side of the knit column there is a vertical row if garter stitch.  Two positive attributes of this stitch is that it lays flat and is the same on both side.  Mistake rib is an interesting alternative to 2x2 rib and is relatively simple to achieve. 

Mistake Rib (worked flat)  
Multiple of 4, -1(ex:  25, 41, ect.)
Row 1: *K2, P2*to last 3 stitch K2, P1

Mistake Rib ( in the round)
Multiple of 4, -1 (ex: 23, 39, ect.)
Row 1: *K2, P2*

Wednesday, November 16, 2011

Sewing the Steffi Jacket: The lining

I finished sewing the lining.  Here is my progress. 


And here is the finished lining with sleeves and all!

First, I am a pro at setting in those sleeves.  After doing something 4 times one should improve.  The silk was so floaty and slippery it made me crazy trying to sew it.  I finally gave in and went pin crazy, it was the only way this fabric would behave. 

There is a week before Simon and I go up to my parents for Thanksgiving, can I finish this jacket?  I'm going to take a small bite out of it everyday.  Here is the plan of attack.  To day I am going to hem the sleeves first on the lining and then on the jacket.  Tomorrow will be hand basting (crazy right) the lining to the jacket.  Then on Friday the facing will get attached.  Now here is where I'm torn.  I think I'm going to use some bias binging to finish the edge of the facing so that the edge isn't bulky and it is easier to sew it down to the lining.  If this is what I decide I will be doing that also on Friday.  On Monday (I take the weekends off if possible) I will hem the sleeves and tack the facing down to the lining.  Finally on Tuesday I will sew the button holes.  This is the part I am super nervous about.  Good thing I have that muslin to practice on.  Leaving me Wednesday to sew the buttons on to the Jacket.  Oh, and somewhere in there a trip to the fabric store is required to buy the buttons, and finishing a sweater.  Wish me luck!


Tuesday, November 15, 2011

Technique Tuesday: Swatching I

Like I said yesterday I am a big advocate for swatching.  It is really important whether you are designing your own knit item or using a designer's pattern.  Everyone's gauge is different and swatching allows you to see if you need to make any adjustments to the needle size or stitch count. Swatching also lets you get to know the stitch pattern you are going to use and lets you experience your yarn and get to know it before you take on your project.

There are plenty of reasons to swatch and today I am only going to talk about one of those reasons, stitches per inch.  When you knit a swatch you want to make sure that the swatch is about 4 to 5 inches in width and height.  If you are using a pattern there will be a suggested gauge of usually 2 to 4 inches you want to knit about an inch to two inches more than this suggested gauge so that you can get an accurate measurement.  If you are looking to find a certain yarn's stitch per inch look at the ball band, there is usually a suggestion of an amount of stitches to 4 inches or to 10 centimeters,  this is a good place to start.  If a suggested gauge is 20 stitch to 4 inches when you cast on for your swatch you will want to cast on about 30 stitches.

  Here is a basic swatch in a worsted weight yarn on size US 8 needles knit in stockinette.  I cast on about 28 stitches for this swatch.  This gives me plenty of room to measure.

I like to measure from the 2 inch mark on my tape to the 4 inch mark.  Line up your tape so that you have a row of stitches between the two inches on the measuring tape.  Then count the stitches all the way across.  If a stitch is cut in half at the end of the tape it will be added into the stitch count as a 1/2 of a stitch.

Here's a better picture of the stitches I counted.  I got 10 1/2 stitches to 2 inches.  This means that my stitch per inch count is 5.25 stitches for one inch.  The quarter, half and three quarters of a stitch are very important and should be taken into account when trying to figure out your stitches per inch.  This is also why you measure across multiple inches, it makes it easier to find your true gauge. 

Now if you were using a pattern and you had too many stitches per inch you would go up a needle size till you got the right count.  Inversely if you had too few stitches per inch you would go down a needle size till you got the count you were looking for.  It makes a big difference if you are 5 stitches to the inch or 6 stitches. 


Monday, November 14, 2011

Swatches!

Here are the fruits of my knitting labor this past week.  Swatches!  I am a big advocator for swatching when it comes to knitting, whether it is your pattern or other designers pattern.  I won't get on my soap box about swatching till tomorrow, but I thought I would share the lovely little squares I've been knitting. 

Friday, November 11, 2011

For The Love Of Philly: Nangellini

Photo by Adam's Nanny
 When you walk into Nangellini you are welcomed by the warmth of color.  The shop is bursting with it, if you were ever able to be inside of a rainbow I imagine that this is how it would look.  From the art on the walls to the color of Nancy's hair vibrancy rules in this shop.

Nangellini is my LYS.  I'm a bit biased when it comes to this store as I use to work here and it is two blocks from my apartment.  Located on South street between 9th and 8th street this store not only has wonderful yarn and all the knitting accessories one may need but you can also find fiber for spinning and felting along with finished items.  The Finished Items are mostly the work of the owner Nancy.  She is a free form fiber artist, with vibrant pink and sometimes purple or blue hair.  Nancy is a self proclaimed hat addict and by looking in the front of the shop you can see the evidence of her love of knitting and crocheting hats.  She also knits beautiful lace mandalas as wall hangings that are hung through out her shop.  

Nangellini
 Nangellini specializes in unique yarn.  This means Nancy stocks luxury fibers, trendy, anything with sparkle, recycled sari silks, banana fiber, and tons of other fabulous yarn.  She stocks one of my favorite company's yarn Mirasol.  If you are looking for a unique gift for a knitter of someone who thinks outside of the box you should check out this fab shop on South St.

You can check out Nangellini online or on Facebook.


832 South St
Philadelphia Pa 19147
215-413-5001

Hours
Monday: by Appointment Only
Tuesday: 11am-9pm
Wednesday & Thursday: 11am-6pm
Friday: 11am-8pm
Saturday: 12pm-7pm
Sunday: 12pm-6pm

Classes
Nancy offers classes for Knitting and crochet.
Classes are scheduled with Nancy based on availability.
Call to schedule a class with Nancy.

Knitting Circles:
Tuesday at 6-9pm
Sunday at 3-6pm
*$5 to participate or free with purchase of $5 or more*
Receive 10% off yarn purchases during the circle 

Thursday, November 10, 2011

Obi Belt Tutorial

 I made this belt for my purple shift dress.  It was super easy and added that extra something to that dress that I thought I would share how I made this belt.  It's not a true obi belt, but that was my inspiration to this project. 
Materials:
*About a 1/2 a yard of a woven fabric (My green belt was duponi silk and the one I made for the tutorial is a heavy quilting cotton.)
* Thread
*Interfacing (If using a light weight fabric I suggest using a fusible interfacing for the middle section of the belt, but If you are using a heavier fabric the interfacing isn't necessary.)


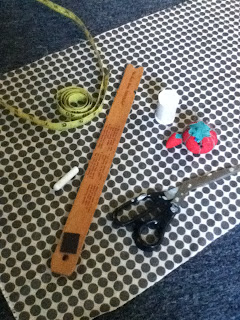
Tools:
*Measuring Tape
*Ruler
*Chalk
*Scissors
*Pins
*Sewing Machine

Step One
Measure your fabric length and split that into thirds.  If you want a wider belt you will need a longer piece of fabric.  My green belt is about 3 1/2 inches wide so my thirds were all about 8 inches wide.  The fabric I am using for this belt is only 16 inches long so I will be splitting it into 5 inch sections
Use your chalk and ruler to mark your fabric.

(If you are using interfacing you will want to cut a piece out that is the same length and width as one of the thirds of fabric)


 Step Two
Cut your fabric into thirds and attach interfacing to one of the strips, this piece will be your middle section of the belt.
Pin the ends of the belt and sew a seam with about 1/2 an inch seam allowence.


Press seams open.


Step Three
Fold your belt in half with right sides facing and pin.  Sew the end and side seam of the belt leaving one end open.


Turn the fabric tube right side out and press.


Step Four
Fold unfinished edges of the open end in and pin.


Top stitch around the edge of the entire belt leaving about a 1/8 to 1/4 of an inch edge.


There you have it a quick sash or obi belt.


Because of the belts length you can tie it a bunch of different ways.  Wrap it around as many times as you can and tie a small knot.  Wrap it around twice and tie a dramatic bow at the front. 

Wednesday, November 9, 2011

Sewing the Steffi Jacket: Sleeves and Silk

It's a river of silk!  I am making head way.  The past few days has felt like a struggle to sew, but I pushed threw it and now I am on to the lining.  The lining pieces are cut out and are waiting for me to only change the color of the thread in my machine. 

The jacket its self is hanging neatly on a hanger look very dapper and waiting for it's lining.  I might hem the sleeves before I start the lining.  I am really proud of how the sleeves turned out.  It took an hour to set them in and I wasn't sewing them by hand.  It was like complicated sleeve surgery where everything had to line up just so.  The one good thing is that after struggling with the first sleeve the second was a breeze to complete. 

The fact that this garment is coming together so nicely is getting me pumped.  The challenge of sewing this jacket has kept me on my toes and made me have to learn new skills.  As scary as it first was I am glad I took this project on. 

Here is one more pic of the sleeve, I am really excited about them.