Showing posts with label sewing project. Show all posts
Wednesday, March 28, 2012
Bustier Hibernation and a Quick Project
Here it is, unfinished. I know I said it would be done at the end of March, but I just can't take any more bustier sewing. Therefor this project is going in to hibernation. I want to get things for Me Made May 2012 squared away before I wrestle this project into submission.
My frustration lies in the fact that my lining and garment aren't lining up and the hook and eye tape is pulling funny. I need a break and so I'm taking one.
On Sunday I worked on the bustier for about an hour and it felt like I was banging my head against a brick wall. I put the bustier away and I pulled out this lovely purple cotton blend jersey that I purchased a while back. Then I looked up this awesome dolman sleeve top tutorial from Merricks Art. In about an hour I had completed a great top. I love an instant gratification project.
It's super comfy and I can add it to my me made tops. Yes three tops! I am going to make at least one if not two more of these as they will be great to wear to work.
I am looking to maybe stencil something fun on this top. I found this great freezer paper stencil tutorial on Freshly Picked. I was thinking an easy old heart or maybe something more me, maybe a unicorn? I don't know the possibilities are endless.
Labels:
Blue Betty,
bustier,
dolman sleeve top,
freshly picked,
merricks art,
Sewing,
sewing project
Wednesday, March 21, 2012
Bustier III: Cups and Casings
My hook and eye tape finally arrived in the mail the other day. I have enough for about three bustier tops, but I'll sock away the extra for a rainy day.
Things are going slow on the bustier front. We've been busy and the weather has been so nice that Simon and I have spent a lot of time outside. I have been making progress and here is what's been accomplished this week.
The seam allowances are too small to use as a casing for the boning I bought so I had to whip up some casing to sew into the bustier. I made them about 1/2" wide, my boning is 1/4" and after I sew them in I'll lose a couple of 8ths of an inch.
All Pinned and ready for the machine.
Here's the right side of the bustier before I ironed it. You can barely see the top stitching.
Here's the wrong side. For having to improvise this part of the pattern I am really pleased with how it came out.
I was going to but in the bra cups next, but realized that the back band and the top half of the cups lined up after I had pinned one in. I back peddled, pulled out a million pins and started over on the back band.
Now the bra cups were a pain in my side. I've sewn curved seams before (the Steffi Jacket) but this was a whole new bag of suck. The center seam on the bottom of the cup has to line up with the seam on the bodice part. Then the seam that runs across the middle of the cup has to line up with the seam were the bodice and the back band are sewn together. Oh, and don't forget that the center of the bodice meets yp with the top inside edge of the cup.
However after all of that I am quite pleased with how it all came out. The best part is that all of my bits fit where the should.
Next on the list of to dos:
-Straps
-inserting the boning
-attaching the lining
-attaching the hook and eye tape
-hemming or finishing the bottom, i'm thinking Bias tape, but we'll see.
Wednesday, March 14, 2012
Bustier II: Sewing the Easy Bits
I have been diligently working on my bustier top. All of the supplies are purchased and are either in my apartment or on their way to my apartment (I did end up buying that turquoise hook and eye tape) now all I can do is sew.
I cut out the interfacing and fused it to the pieces. There is something almost zen like to ironing fusible interfacing on to your pattern pieces. I like the magic of the glue melting on to the fabric and making it stiff. (Ok, maybe it's a bit weird, but I like ironing anyway so fusible interfacing is an exciting twist on an old favorite.) The one thing about this pattern that I have found a bit tedious is that there is no seam allowance. You can see in the above photo that I had to measure and cut around the pattern pieces.
I decided that since I have all of these little pieces that I need to sew together before I can piece them together I would sew them all at once.
I also decided to sew the lining too. I mean there all the same pieces and the same fabric why make the bustier only to have to sew the lining.
The part I'm a little bit dreading with this project is sewing in the cups.
Sewing them together was really easy.
Really easy and kind of fun to watch the two dimensional pieces become a three dimensional item. And the best part is they fit. I mean who could resist trying on a freshly sewn bra cup. Too bad Simon wasn't quick enough with the camera. I'm sure I looked pretty funny holding up a bra cup to my chest with a quizzical look on my face.
The next part is what I'm calling, "sewing the difficult bits". Here is my list of sewing to dos:
-Make casings for boning
-Sew casings to top
-Sew cups to top
-Insert boning
-Attach straps
-Attach hook and eye tape
-Attach Lining
-Hem or whatever I finally decided to do at the bottom
Wish me luck!
Wednesday, March 7, 2012
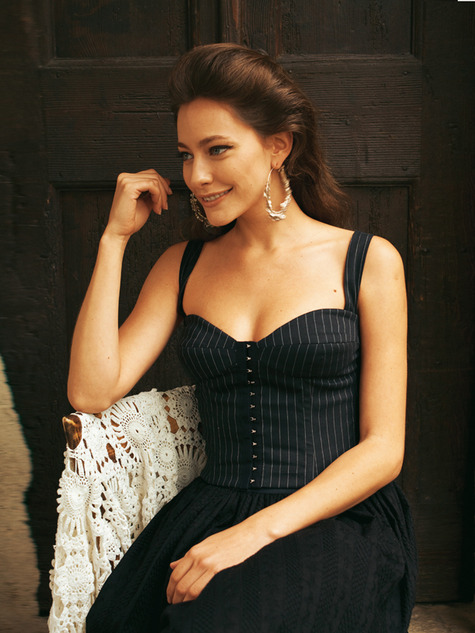
New Project: Bustier Top
| Burda Style |
I've Picked my next project. This is another Burda Style pattern. I've had my eye on this top for awhile. It looks simple enough and is even rated novice. But I'm wondering where Burda Style got that one from because after looking at the pattern I would have rated this as intermediate. The thing has princess seams, boning and a lining, although that part isn't obvious even in the directions. The thing that is on my side is that I have all the skills needed to sew this even if I find using boning a bit intimidating.
I found some awesome teal gingham at the fabric store I frequent. Even better it was only $1.93/yard. So I'm not out fabric costs if this project doesn't run smoothly or come out right. The boning was also pretty cheep, $2/yard . The last thing I need to get is some hook and eye tape. The place I bought the boning only had black, and this project needs white.
| Shrinkle |
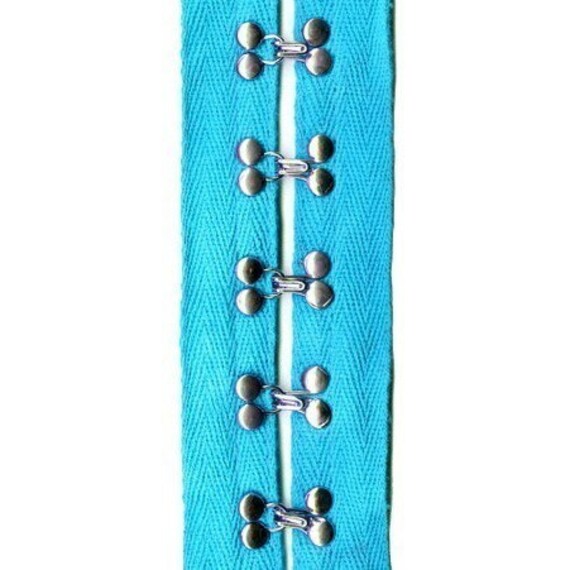
However I did find this teal hook and eye tape on etsy that I might be tempted into buying.
So here's my break down of how I am going to accomplish this. I think I'm going to need about two weeks to finish this, maybe three, but I'm going to aim for two.
Week 1: Cut out pattern, interface fused, and seams sewn for boning channels, bust pieced together
Week 2: Line bust, attach straps, attach hook and eye tape, finishing.
If everything goes well I may just make a second of these in a dressier fabric.
Labels:
Blue Betty,
bustier,
Sewing,
sewing project,
supplise
Wednesday, February 29, 2012
Trousers: Complete!
Look! They're finished! They fit and everything. I had Simon snap a quick photo yesterday out in front or our building.
The finishing was really quite easy and I am going to make another pair of these in a more casual fabric. Here are the pics of my finishing bits and bobs.
I made a button hole for for the waist band that goes on the inside and I sewed a button on the other side. I decided to do the waist band closure with a hook instead of a button to give it a cleaner look.
These guys are super cheap. I found a pack of three for $1.97 at my local shop.
Here's the waist band closure all sewn and ready to go .
I admit I'm shore and I had to take the hem up a good 3 1/2 inches. This was also taking the fact I would wear these pants with heels.
Hem done. Now I just need a great excuse to wear these out on the town.
Labels:
Blue Betty,
janina trouser,
sewing pants,
sewing project,
trousers
Wednesday, February 22, 2012
Trousers: The Waist Band
I am in the home stretch of my latest sewing project. All the major elements are complete and so far they look like the picture. I spent the last few days sewing in the zipper and attaching the waist band. Here's what that looked like:
Sewing the pieces together was easy peasy.
This is where is got a bit harder mostly because there was a slight curve to the edge of the pattern pieces.
All sewn on, now it was time to attach the lining piece.
I am not sold on the way the pattern has you construct the waist band. Next time I make this patter (and oh yes, there is going to be a next time, I've already purchased the fabric) I'm going to do this very differently.
Top pinned together ready for top stitching. This was the part of the directions I would have done differently. I would change how you start and end sewing the waist band to the pants, but I think the way I want to do it will be easier and create a cleaner line. Mostly I would sew the top of the outer pieces and the lining together and then stitch the top piece to the pants. Then I would attach the lining to the pants either by hand or with a top stitch.
There it is all top stitched, and pressed, now all I have to do is the finishing bits.
Here's that list:
-sew button holes in waist band
-sew buttons on waist band
-sew buttons on back flaps
-hem
Not too shabby I think these are going to be completed right on schedule.
Sewing the pieces together was easy peasy.
This is where is got a bit harder mostly because there was a slight curve to the edge of the pattern pieces.
All sewn on, now it was time to attach the lining piece.
I am not sold on the way the pattern has you construct the waist band. Next time I make this patter (and oh yes, there is going to be a next time, I've already purchased the fabric) I'm going to do this very differently.
Top pinned together ready for top stitching. This was the part of the directions I would have done differently. I would change how you start and end sewing the waist band to the pants, but I think the way I want to do it will be easier and create a cleaner line. Mostly I would sew the top of the outer pieces and the lining together and then stitch the top piece to the pants. Then I would attach the lining to the pants either by hand or with a top stitch.
There it is all top stitched, and pressed, now all I have to do is the finishing bits.
Here's that list:
-sew button holes in waist band
-sew buttons on waist band
-sew buttons on back flaps
-hem
Not too shabby I think these are going to be completed right on schedule.
Labels:
Blue Betty,
Janina,
janina trouser,
Sewing,
sewing pants,
sewing project
Monday, February 20, 2012
Trousers: The Zipper!
Yesterday I sat down and started to set in this zipper. This was the step in sewing these pants that I was most worried about. A zipper?! In pants?! This seemed to me like the hardest bit of sewing I would ever do. Of course this is how I felt about sleeves and button holes and I've completed projects with both of those.
I had to read and re-read and go over the directions for the zipper a bunch of times. The first few times it made no sense, but slowly it started to come together. By the tenth time I had ready the instructions I finally understood what I needed to do. Although I was still skeptical that I knew what I was doing.
| one side all sewn in |
| getting ready to sew in the other side |
| Finished! (Well The zipper at least) |
Labels:
Blue Betty,
janina trouser,
Sewing,
sewing pants,
sewing project,
trousers,
zipper
Wednesday, February 8, 2012
Trousers: Sewing the Easy Bits
I've made head way on my Janina trousers and so far they are pretty simple to put together. I say this knowing that the dreaded zipper is coming up in the next session of sewing. Here is my progress in a series of photos.
Laying out all the pieces to be cut out. There is just under a yard of fabric left after all the pattern pieces were cut out.
All my pieces ready to go.
Back darts sewn and faux pocket flap, top stitched, button holed, and sewn to the back pieces.
I picked these buttons from my notion stash for the flaps. I'll sew them on last.
Pocket top stitches and hip yoke pinned in place. These pockets were very easy to sew.
Wrong side of the trouser with all the basting stitching done. Soon it will be time to sew the zipper in, ack!
One of the inside seams, this is where I left off. The next steps are to finish the seam allowances, sew the inside seam, and the crotch seam and then it's on to the zipper. I will take detailed photos and notes when it comes to sewing that zipper in. So far so good, this pattern is coming together nicely and is pretty easy.
Labels:
Blue Betty,
Janina,
janina trouser,
Sewing,
sewing pants,
sewing project,
trousers
Tuesday, February 7, 2012
A Little Bit of Procrastination
I know I'm suppose to be working on my Janina Trousers, but I saw this post on Merrick's Art, and having gone thrifting and found a men's polo in teal for $1, I felt I just had to make this first.
The shirt fit me really well so I didn't need to take it in. All I really did was cut the arm band of the sleeve and then hem the sleeve.
And then I cut the collar off and changed the neckline into a scoop neck. I used some pretty teal bias tape from my notions stash to finish the neckline.
I also made the back the front and the front the back, and left the buttons from the original collar. I think it gives the top a little interest.
The buttons are all for show as I sewed the top closed when I attached the bias tape.
Labels:
Blue Betty,
refashioning,
Sewing,
sewing project,
t-shirt surgery,
thrifting
Wednesday, February 1, 2012
Trousers: The Fabric
I found the fabric for my Janina trousers. I found this great wool suiting at the Pennsylvania Fabric Outlet. It was originally $15 a yarn, but they were selling it for half that price so I got two yards. I am really in love with this fabric it has a great drape and is going to make stellar pants.
It's hard to tell in my photo's, but the fabric is a subtle plaid. It's woven with white, gray and light lavender threads. It was a great find at the fabric store. Now I just have to cut out the pattern and get sewing. I'm hoping to have these completed by the end of February.
Labels:
Blue Betty,
Fabric,
Janina,
Sewing,
sewing pants,
sewing project,
trousers
Wednesday, January 25, 2012
Trousers
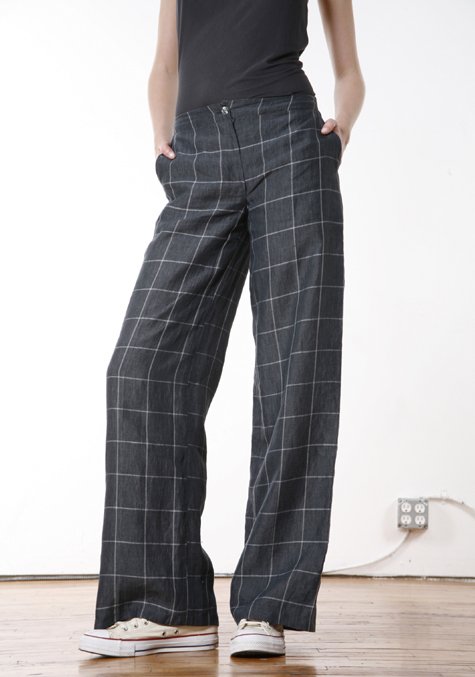
| Burda Style Janina |
The pattern in the photo is Burda Style's Janina. The pattern has been sitting in my account for ages (almost a year), it's not a free patter, but it's only $3.00. Some of completed projects on the pattern page are awesome, and the construction looks pretty straight forward. The only cause for concern is the zipper, I've never made anything with a front lapped zipper. Guess it's time to stop fretting and just do it.
Labels:
Blue Betty,
pants,
Sewing,
sewing pants,
sewing project,
trousers
Subscribe to:
Posts (Atom)