I am excited to see what 2012 holds in store for Blue Betty and me as well. In the past I always talk about my personal resolutions and this year I'm not really making any. Let me rephrase this I am making goals for me and for Blue Betty and starting up something new in the process.
For Blue Betty I have a bunch of goals for the blog as well as designs that I want to publish in the year to come. One of these goals is to have more tutorials and guest bloggers on the blog. Along those lines I am excited to be bringing back Vintage Finds Friday and Fiber Friday to the blog.
Now for the new thing. I am going to start dying yarn on a more regular basis and am splitting my Etsy shop into two separte shops. My patterns and finished items will still be found in BlueBettyShop while all my hand dyed yarn will be in my new shop Alchemy Hour. You can pop over now and get a look at my banner and some other bits and bobs. Alchemy Hour will be open in the new year.
On a personal note I am making just two goals. I want to start getting up a tiny bit earlier, mostly so I can get more stuff accomplished before work and my second goal is to surf more. I mean as soon as it's the weather for surfing.
What goals or resolutions do you have for 2012?
See you in the New Year!
Friday, December 30, 2011
Thursday, December 29, 2011
Looking Back: Tutorials
This year I had tons of fun planing and executing some fun tutorials and DIY posts here on Blue Betty. Here are some of my favorite.

Tutorials
Quick Yarn Embellished Picture Frames
Guest Post With Alli From OPB: Yarn Covered Bangles
Making a Mobius Cowl
Obi Belt Tutorial

Free Knitting Patterns
Easy as Pie Tam Knitting Pattern
Easy Peasy Beanie Pattern
Put a Bow on It, A Knit Headband

Tutorials
Quick Yarn Embellished Picture Frames
Guest Post With Alli From OPB: Yarn Covered Bangles
Making a Mobius Cowl
Obi Belt Tutorial

Free Knitting Patterns
Easy as Pie Tam Knitting Pattern
Easy Peasy Beanie Pattern
Put a Bow on It, A Knit Headband
Wednesday, December 28, 2011
Looking Back: Sewing the Steffi
This fall I attempted to sew my first tailored jacket. It was a challenge that I was apprehensive about at first, but I am glad I took it on. This project really added to my skills as a seamstress and the finished project was exactly what I wanted.

Here's the Links to Sewing the Steffi Jacket
Muslin and Fabric Choices
Finishing the Muslin
Fear Based Procrastination
Making Headway
Sleeves and Silk
The Lining
Final Touches

Here's the Links to Sewing the Steffi Jacket
Muslin and Fabric Choices
Finishing the Muslin
Fear Based Procrastination
Making Headway
Sleeves and Silk
The Lining
Final Touches
Tuesday, December 27, 2011
Looking Back: Me Made June '11
This year I participated in my first Me Made event through So Zoe...What Do You Know? Here are some of the photos that I wasn't able to post because of camera and internet issues.
 |
| One of my favorite refashion, my Cowboy tank and my paint jeans. I had just finished a high ropes course at Camp Edge. |
 |
| The same night we went bowling. I wore my lavender pencil skirt that I made the day before I went to camp. |
 |
| It was cooler the next day and I wore my hand knit cotton nautical sweater and my comfy shorts. Perfect for meetings in air conditioned spaces. |
 |
| One of my favorites! My melon striped tunic and my self stitched black leggings. My hair is perfectly tousled from a ride in the golf cart. |
Monday, December 26, 2011
Looking Back at 2011
I hope everyone had a wonderful holiday! I'm taking the next few days to look back at moments in 2011 either from this blog, my Etsy, or life in general.
One of the most exciting things that happened in 2011 was the publication of two of my patterns in Creative Knitting Magazine.
One of the most exciting things that happened in 2011 was the publication of two of my patterns in Creative Knitting Magazine.
 |
| My I-cord cowl was published this summer in the September 2011 issue. |
 |
| This Modular Hexagon bag was knit during a heat wave in Philly ans was published in the January 2012 issue that came out in November. |
Saturday, December 24, 2011
Day 12: The Jensen Family Christmas Playlist

1.) The First Noel, by Eve 6 (Amanda & Zach)
2.) Jingle Bell Rock, Bobby Helms (Simon)
3.) Christmas in America, Alan Jackson or Kenny Rogers (Mom)
4.) Grandma Got Ran Over By a Reindeer, Elmo and Patsy (Dad)
5.) I'll Be Home For Christmas, Bing Crosby (Grandma J)
6.) White Christmas, Bing Crosby (Jensen Family Favorite)
7.) Holly Jolly Christmas, Burl Ives (Amanda)
A few staples for Christmas:
Rudolph the Red Nose Reindeer
Let It Snow
Winter Wonderland
Have Yourself a Merry Little Christmas
Rockin' Around the Christmas Tree
I hope everyone has a wonderful Holiday this year! Merry Christmas and Happy Hanukkah!
Friday, December 23, 2011
Day 11: Traditions with Zach from Thoughts of a Nobody

When I hear someone mention Christmas I don’t think about snow, presents, or even sweet little baby Jesus in the manger. I think of family traditions. I see a family piling into a cramped car and heading out to purchase a Christmas tree. The whole family spending hours walking around a maze of Douglas Firs, Leyland Cypresses, and Blue Spruces searching for the perfect tree, and only accepting its perfection when everyone gives it their vote. I see the same family all together decorating the tree, and making sure no branch is left untouched, and the ever so familiar battle with tangled lights. I see a little boy and girl mesmerized each year by the story of Santa Claus, and the two leaving milk and cookies for good ole’ Saint Nick. The two young kids waking up Mom and Dad on Christmas morning even before the sun peaks above the horizon, and rushing them downstairs to see what Santa left them. Looking back into my own vault of Christmas memories I’d have to say I’ve had my fair share of experiences with traditions. I remember decorating the tree with handmade ornaments created by myself and my sister, and hers always being more perfect than mine. I loathed her for that, and still do, of course in a loving manner though. I remember always having Christmas Eve at my grandparent’s house, and having a spectacular dinner to end the night. I remember waking up on Christmas day, only to find my Mom and Dad already awake waiting for my sister and myself. I remember my sister’s meticulous procedure at opening presents while I sat next to her tearing away like some rabid animal. These all may seem splendid, but there is one tradition that I thrive off of, that seems to bounce around in my head. This tradition is baking Christmas cookies. I had to ask myself why this stuck out so dominantly in my mind and the answer is that it is what I considered the start of the Holiday. We always baked these cookies at my grandma’s house a few days before the 25th of December. My grandma would mix the recipe that she got from her mother the day before, so when my sister and I showed up it was ready to go. It never occurred to me when I was young that my grandma did this, In keeping with the Christmas spirit, it always seemed like magic. We would roll the cookie dough out and then choose our cookie cutting weapons. I always and still do reach for the Christmas tree shaped cutter first and I have no idea why it just seemed right. I remember how much fun the simple act of cutting shapes into the dough was, and always sneaking a taste of the sweet dough when no one was looking. It didn’t really matter though; everyone was doing the same thing. I remember my grandma always making “dirty” Christmas cookie men, and never understanding what it meant until years later. Decorating the cookies was always my favorite part. I always loved frosting a candy cane shaped cookie, shaking red sprinkles to form stripes like the iconic look everyone knows. We always finished decorating early and never ended up with the right amount of cookies, too many were lost to temptation along the way. I loved baking and decorating Christmas cookies during the holiday, and I someday hope to share tradition with my own kids and grandkids. While some traditions have faded away in our family due to loss of loved ones, steps towards a new life in a big city, or even just a simple move to college, we always manage to relive those memories through a simple act of baking and decorating with the Christmas spirit.
You can read more of Zach's musings on his blog Thoughts of a Nobody.
Thursday, December 22, 2011
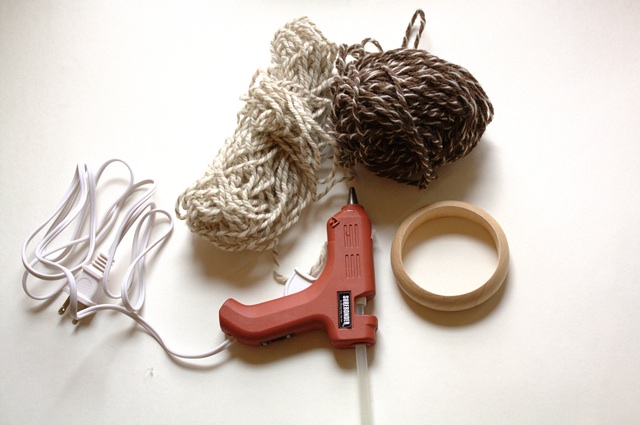
Day 10: Quick Yarn Embelished Picture Frames


Frames (mine are some wooden frames from Ikea that I painted earlier)
Yarn (I had some recycled sari silk sitting around that I wanted to use up)
Scissors
Hot Glue Gun


Wednesday, December 21, 2011
Day 9: Guest Post with Jess from Upcountry Vintage
Hi there! Jess from Upcountry Vintage here. I love to share creative ways to upcycle items on my blog. On my last trip to see my family in California in September, I came across a lot of vintage brooches and broken jewelry that had been passed down to me. They were missing stones, backings, or other important parts to function as jewelry.
I think a great way to use vintage jewelry is incorporating it into your gift wrap as the centerpiece in lieu of a bow. I have tied up the following gifts with ribbon, accented them with squares of burlap, and then placed a broken trinket in the center.
You can usually find pretty things like this while thrifting or going to garage sales, and you can make a nice looking package for about the same cost as a box store bow or gift bag.
Check out these other great links for ideas and inspiration for incorporating vintage baubles into your gift wrapping this Holiday!
Susan Jane Jewels
Confetti Style
Design Sponge: Gift Toppers
Also, be sure to check out my blog for my 12 Days of Gift Wrapping for lots of ways to add special touches to
your gift giving this season!
Happy Holidays.
Love, Jess
I think a great way to use vintage jewelry is incorporating it into your gift wrap as the centerpiece in lieu of a bow. I have tied up the following gifts with ribbon, accented them with squares of burlap, and then placed a broken trinket in the center.
You can usually find pretty things like this while thrifting or going to garage sales, and you can make a nice looking package for about the same cost as a box store bow or gift bag.
 |
| The centerpiece of this package is a ring I loved but it broke |
 |
| The focal point of this gift is a brooch on a large piece of ribbon |
Susan Jane Jewels
Confetti Style
Design Sponge: Gift Toppers
Also, be sure to check out my blog for my 12 Days of Gift Wrapping for lots of ways to add special touches to
your gift giving this season!
Happy Holidays.
Love, Jess
Tuesday, December 20, 2011
Day 8: A Project Bag for a Knitter


1/3 yard 45 inch fabric
1 yard cord or ribbon for drawstring
Thread
Chalk
Pins
Scissors
Sewing machine
Iron


Monday, December 19, 2011
Day 7: Yarn Covered Bangles with Alli from OPB


What you'll need: a bangle blank (pick
one up at the craft store, or use an old bangle that needs a facelift), yarn,
hot glue gun.
Step 1: secure the yarn to the inside of
the bangle with a spot of hot glue.
Begin wrapping, being sure that there's no space between the loops.

Step 2: continue wrapping, adding a spot
of glue to the inside every quarter or half inch. Be careful not to burn yourself - pull the
yarn across the glue, instead of pressing it with your fingers. You can either
make your bracelet a solid color, or add stripes by changing yarns.

That's all there is to it - enjoy your
new bracelets!

Thank you for having me, Amanda, and
happy holidays, everyone! Stop by and
see me sometime at One Pearl
Button!
Sunday, December 18, 2011
Day 6: Dutch Spice Cookies

Dutch Spice Cookies (makes about 2 to 3 dozen)

Ingredients
3/4 Cup Butter (1 1/2 sticks) at room temperature
1 Cup Firmly Packed Dark Brown Sugar
1 Egg
2 Tablespoons Milk (I used Unsweetened Soy Milk)
1 3/4 Cups All Purpose Flour
2 Teaspoons Cinnamon
1 Teaspoon Ground Cloves
1 Teaspoon Ground Nutmeg
1/2 Teaspoon Baking Powder

1. Combine flour, baking powder and spices in a bowl and set aside

2. Cream together the Sugar and the butter. If you have a mixer this is super easy, but if you don't, like me, cut the butter up into smaller pieces and let them soften a bit over low heat, but not melt.Remove from heat add the sugar and cream butter together with a spatula. (This is a great arm exerciser by the way.)

3. Add in the egg and milk to the butter and sugar mixture, beat till smooth.
4. Slowly add in the flour and spice mixture folding it into the butter and sugary a little bit at a time.
Once the dough has been made cover it and place it in the fridge for about 1 hour.
After an hour or when the dough is firm, preheat the oven to 300 degrees and remove the dough from the fridge and roll the dough into 1 inch balls. I like to roll mine in a bit of regular sugar so that after they have baked they have a pretty sparkle to them.

Place on a cookie sheet and either flatten the dough balls with a cookie press or a fork.

Bake for about 8 to 10 minuets. If you want a soft center back for 8min if you want your cookies to be crispy bake for longer. I like mine crispy for coffee dipping.
Let cookies cool and enjoy!
Subscribe to:
Posts (Atom)