Wednesday, February 29, 2012

Trousers: Complete!


Look!  They're finished!  They fit and everything.  I had Simon snap a quick photo yesterday out in front or our building.

The finishing was really quite easy and I am going to make another pair of these in a more casual fabric.  Here are the pics of my finishing bits and bobs.


I made a button hole for for the waist band that goes on the inside and I sewed a button on the other side.  I decided to do the waist band closure with a hook instead of a button to give it a cleaner look. 


These guys are super cheap.  I found a pack of three for $1.97 at my local shop. 


Here's the waist band closure all sewn and ready to go .  


I admit I'm shore and I had to take the hem up a good 3 1/2 inches.  This was also taking the fact I would wear these pants with heels.  


Hem done.  Now I just need a great excuse to wear these out on the town. 

Tuesday, February 28, 2012

Technique Tuesday: Spit Felting

I hate having to weave in ends in my knitting.  When I cast off I want to be done with my project, except for a few minor finishing bits like blocking or buttons.  Because of my hatred of ends I try to avoid them at all costs and one of those ways is by spit felting.

Spit felting is a way to join two strands of yarn together with out a knot or with out ends hanging out.  It only works with animal fibers, I repeat it only works with animal fibers.  This is because animal fibers have scales on the individual fibers that allow them to lock together.

Things that will NOT spit felt are: Super wash anything, cotton, linen, silk, bamboo, rayon, pretty much anything that is a plant fiber.  All of these fibers don't have scales.  The reason it won't work in super wash is because that fiber has been treated and changed so that it's scales have been removed.

However Spit felting will work on a blended fiber as long as there is about 35%-50% animal fiber in the blend.  For example I've never had a problem spit felting a 50/50 wool silk blend.  


Now, how does one spit felt.  Here is my example.  I want to join the end of one ball of wool to the beginning of another ball of yarn.  (I'm using two different colors of yarn so you can see the process more clearly.)


You are going to untwist the plies.  If it is a singly ply you will just fray the end of the yarn and untwist it.  Try  to give yourself about an inch and a half to two inches of untwisted plies.  


Now get those untwisted plies nice and wet with spit.  Yup these puppies are soaked in my spit.  You can either stick the yarn right in your mouth our find a more lady like way to do it, but lets be honest your going to get a little fiber in your mouth either way.  


Intermingle the two ends making sure they get nice and tangled into each other.  Now for the magic.  Either rub the intermingled fibers between your hands or on your leg.  Make sure to rub back and forth pretty vigorously.


Once your fibers are felted together they will look something like this, one glorious continuous length of yarn.  You can continue to knit, with out worrying about knots or ends to weave in later, 

Monday, February 27, 2012

Thrift Store Find

Simon and I went to the thrift store on Saturday afternoon on a mission for salt and pepper shakers.  Sadly there were no acceptable salt and peeper shakers, so we took a look around just to see if there was anything fun, useful or whatnot.  Then I found this:


I don't own a dressy winter coat.  Because of this I was contimplating sewing one this fall since winter is piratically over here in the city.  My dream coat is pretty much exactly this.  The color is perfect, the cut is flattering and classic, and it's wool.  I was prepared for this coat to cost $5-$7 at this particular thrift store. Guess how much this coat was....it was $1.


That's right one dollar.  There had to be something wrong with this coat for it to be only one dollar.  I was expecting a horrid stain, a ripped sleeve, burn marks.  I inspected every inch of this jacket and could only find one thing wrong.  One of the buttons was ripped.


This was it.  Nothing else was wrong with this jacket.  So I snapped it up.  I see the ripped button as an opportunity to add some of my personal flare to the jacket by replacing the buttons.  And if I am going to replace the buttons that means a trip to the fabric store!

Friday, February 24, 2012

Fiber Friday: Socktastic!

I love sock yarn and I'm not even a sock knitter.  I have hank after hank of sock yarn in my stash just wait to be knit into a cozy pair to warm mine or a loved ones feet, or to be knit up into something else warm the options are endless.  What does everyone need in their stash...a few great hanks of sock yarn either for socks, shawls or mits.  These hanks are all from independent dyers on etsy.

NoTwoSnowflakes

twisttwine

DestinationYarn

WanderingWool

moonlightandlaughter

FiddleKnits
CakewalkYarns
dragonflydyeworks

Thursday, February 23, 2012

DIY: Transparent Skirt


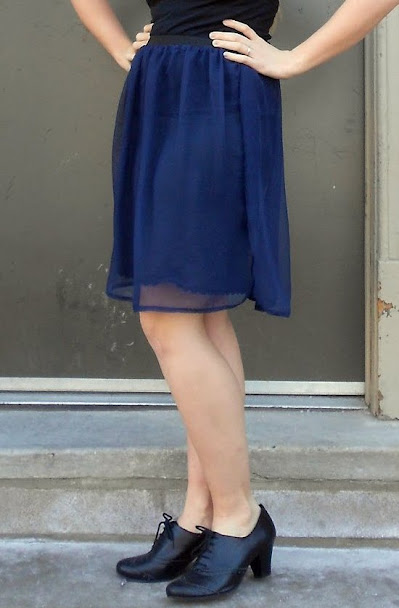
There is a new trend for the spring that I actually like a lot and it's the transparent garment.  I don't want to spend money on something I'm not too sure of and that might just be trendy for all of a minuet so I decided to make my own transparent skirt.  Since I'm short I decided to make a knee length version.


This tutorial is pretty easy and you just need a few sewing skills.  As sewing skills go you need to be able to sew a straightish seam and now how to sew fabric to elastic using a zig zag stitch.  This is a pretty easy skirt to make and you probably wouldn't have too much trouble if you haven't sewn fabric to elastic before.


Materials:
-1 Yard 45"or 60" (the width of your fabric is going to determine the length of your skirt) of transparent fabric.
-Wide Elastic (1 1/2"-2"), enough to go around your waist plus one inch.
-Thread that matches the color of your fabric
-pins
-sewing machine with zig zag stitch

First you will need to measure your waist or where you want your skirt to sit on your body.  Add one inch to this measurement.  This new number is the measurement for the elastic.  Cut you elastic to this length.


Next you will sew your elastic together with 1/2 and inch of seam allowance.  Your waist band is now
complete.


Now to work on the skirt. fold you fabric in 1/2 lengthwise.  Cut along the fold.  This is the front and back pieces of your skirt.  (My fabric was 45" and I bought a yard so after I cut my fabric in half I had two 22" wide x 36" long pieces.)
Note: You will want you skirt fabric to be about twice as long as your waist band.  Since my waist band was 28" I cut 6" off both of my skirt pieces.  The total circumference of my skirt is about 60"


Pin and sew the two side seams together.  I highly suggest using your favorite seam finishing technique as this fabric is prone to fraying.

Hem your skirt I suggest a baby hem, but any old hem will do.


Now the tricky part, it's time to attach your skirt to the waist band.  Pin the skirt to the top of the waist band as evenly as possible.  I lined one of my side seams up with the seam on my waist band.  It will look something like this.


Using the zig zag stitch on your sewing machine sew the skirt fabric to the elastic while stretching the elastic till the fabric lays flat.

It should look similar to this once sewn in place
Turn your elastic right side out and voila! A fab, trendy sheer skirt.  I wore mine with a black slip, but you can style this skirt a bunch of different ways.  Try a colored slip or even a fun floral skirt or a mini skirt, you can style this skirt in so many ways.

Wednesday, February 22, 2012

Trousers: The Waist Band

I am in the home stretch of my latest sewing project.  All the major elements are complete and so far they look like the picture.  I spent the last few days sewing in the zipper and attaching the waist band.  Here's what that looked like:

Sewing the pieces together was easy peasy.

This is where is got a bit harder mostly because there was a slight curve to the edge of the pattern pieces.

All sewn on, now it was time to attach the lining piece.

I am not sold on the way the pattern has you construct the waist band.  Next time I make this patter (and oh yes, there is going to be a next time, I've already purchased the fabric) I'm going to do this very differently.

Top pinned together ready for top stitching.  This was the part of the directions I would have done differently.  I would change how you start and end sewing the waist band to the pants, but I think the way I want to do it will be easier and create a cleaner line.  Mostly I would sew the top of the outer pieces and the lining together and then stitch the top piece to the pants.  Then I would attach the lining to the pants either by hand or with a top stitch.

There it is all top stitched, and pressed, now all I have to do is the finishing bits.
Here's that list:
-sew button holes in waist band
-sew buttons on waist band
-sew buttons on back flaps
-hem

Not too shabby I think these are going to be completed right on schedule.

Tuesday, February 21, 2012

Fall Mural


This is or was one of my favorite murals in my neighborhood.  Sadly it is now covered up with a big ugly house that sticks out like a sore thumb among all the brownstones surrounding it.  I will miss seeing this beautiful mural everyday when I walk to work.

Monday, February 20, 2012

Trousers: The Zipper!


Yesterday I sat down and started to set in this zipper.  This was the step in sewing these pants that I was most worried about.  A zipper?! In pants?! This seemed to me like the hardest bit of sewing I would ever do.  Of course this is how I felt about sleeves and button holes and I've completed projects with both of those.

I had to read and re-read and go over the directions for the zipper a bunch of times.  The first few times it made no sense, but slowly it started to come together.  By the tenth time I had ready the instructions I finally understood what I needed to do.  Although I was still skeptical that I knew what I was doing.

one side all sewn in 
getting ready to sew in the other side
Once I had completes this I felt that I had conquered a giant hurdle in sewing.  Pants and a zipper seemed to me like a huge, huge feat of sewing skill.  I say celebrate the small things, and for damn sure I'm celebrating this one. 

Finished! (Well The zipper at least)

Friday, February 17, 2012

February Link Love

It's time for link love this moth and I am super excited about all the links I've found around on some of my favorite blogs.  Here they are:

Delighfully Tacky
1. Elizabeth from Delightfully Tacky always seems to have the best recipes.  These carnitas look so yummy.  I think I know what we'll be eating this weekend.

30 Pounds of Apples
2.  Need to pamper yourself or need a luxurious gift to give?  30 Pounds of Apples can teach you how to make Homemade Sugar Scrubs.

Love Elycia
3.  How cut are these zig zag nails.  Next time I want do my nails i might just have to try my hand at Elycia's tutorial.

My Girl Thursday
 4. My Girl Thursday has a great way to put the love back in a favorite pair of jeans.  I'm going to keep this tutorial up my sleeve for the summer.

One Sheepish Girl
5. This may be the cutest little knitting project.  Learn how to knit a espresso machine handle cover over at One Sheepish Girl.

Etsy Blog
 6. Have a scarf that needs some sprucing up.  There is a great tutorial on the Etsy Blog about embroidery with Diana Rupp.

Thursday, February 16, 2012

Free Knitting Pattern: Lace Legs


Need something to warm up your legs when the temperatures drop, or do you miss wearing some of your favorite skirts or dresses because it's so chilly out.  Or are you like me and are longing for spring and just can't accept that its cold out and you need to wear pants.  Why not try knitting a pair of lace legwarmers in your favorite fiber to keep your gams toasty warm while you wear your favorite flirty skirt.

These are simple to knit only requiring the knitter to have basic lace knowledge, mainly yarn overs, and two stitch decrease.

Materials
3 balls of Knit Picks Stroll Sport Weight (137 yards, 75% superwash merino, 25% nylon) in Jackrabbit Heather
16 " US 4 Circular Needle
Stitch Marker
Tapestry Needle

Gauge
13sts x 14 rows = 2"x2"

Leg Warmers (Make Two)
CO 80 sts, place marker and join being careful not to twist cast on edge.
Work in 2x2 rib for 17 rows or about 21/2 inches
Knit 1 round
Start Fish Tail Lace

Fish Tail Lace
R1: *YO, K2, Sl 2 Kwise, k1 passo, K2, YO, K1*
R2: Knit All
R3: *K1, YO, K1, Sl 2 Kwise, k1 passo, K1, YO, K2*
R4: Knit All
R5: *K2, YO, Sl 2 Kwise, k1, passo, YO, K3*
R6: Knit All

Work Fish Tail Lace for 15 repeats
Knit 1 round
Work 2x2 rib for 17 rows or 2 1/2 inches
BO in Pattern
Weave in ends and block.


Abbreviations
K = Knit
YO = Yarn Over
Sl = Slip Stitch
Kwise = Knit Wise
Passo = Pass stitch or stitches over new stitch
CO = Cast On
BO = Bind Off